Open the Windows >> Orders screen and keep it open throughout this Lesson.
Following this lesson, the user should be able to:
1. Export text information
2. Plan a background story outline
3. Select the game tempo
1. Export text information
The written orders for each of the scenarios can be exported into a text file that may then be read by any text editor. It is recommended that this be done for each Scenario Design Tutorial Lesson as the user progresses.
Under the Edit pull-down menu, select the Export Text Data command. Enter "Lesson41" as the file name and Lesson41.SCT will be created. This file can be opened and read by any text reader.
2. Plan a background story outline
Creating a scenario requires forethought and planning. Use of the Scenario Editor is not specifically required for this Scenario Design Lesson.
There are infinite ways in which to create a scenario, but the process can be generally described by two common steps:
A. Craft and Research the conflict
B. Implementation and Testing
A. Craft and Research the conflict
This is the creation of the background story for the scenario and the units that will be involved. Scenario inspiration can come from many sources such as books, newspapers, and other wargames. They can be fictional or historical. The amount of research is at the sole discretion of the designer.
The more detailed a storyline is, the easier it will be to implement. The storyline should answer fundamental questions such as:
WHAT is the reason for the conflict?
WHEN does the conflict take place?
WHERE does the conflict occur?
WHO are the groups in conflict?
WHY are they in conflict?
HOW will this conflict be resolved?
The Scenario Design Tutorials will use a hypothetical situation consistent of:
WHAT
This is a training exercise
WHEN
March 19, 1995 is arbitrarily set
WHERE
Iceland is selected at random
WHO
Three groups/sides (Alpha, Bravo, and Charlie)
WHY
Alpha will simulate the invasion of Iceland while Bravo defends.
Charlie is neutral
HOW
Alpha will be victorious if it simulates landing troops on Iceland. Bravo
will succeed if it can prevent the invasion by destroying key enemy units.
3. Select the game tempo
Once the basic questions are answered, it is time to determine the battlefield and which units to include. The size of the battle area will determine the tempo of the game.
Quick:
5x5 degrees Long/Lat Littoral surface conflict
Average:
10x10 degrees Long/Lat Small surface groups
Slow:
20x20 degrees Long/Lat Carrier groups
Very slow:
50x50 degrees Long/Lat Multiple bases and groups
This scenario will have an average tempo, but we will use a larger map since it is always better to have the battle area larger than necessary since it is not possible to change a map once it has been created. Therefore, the battle area will be a 10 x 25 degree map. The larger size will be mitigated by the relatively few units in the OoB.
The list of units is known as the Order of Battle [OoB].
Side Alpha: Task Force Moskva
CVHG Moskva RUS 67-94
12x Yak-38 Forger A RUS 71
3x Ka-29RLD Helix RUS AEW 81
3x Ka-25PL Hormone A RUS 65-95 ASW
CG Slava RUS 90
1x Ka-27 Helix A RUS 81
LST Alligator Proj. 1171 RUS 64
BCGN Admiral Ushakov RUS 91
3x Ka-25PL Hormone A RUS 65-95 ASW
Side Bravo: Base
Bunker C3CM
C3I (Comm Centre)
Radar NATO
A/C Runway (8k ft)
A/C Hangar Large (32 VL)
A/B Ammo Dump
16x F-15E Strike Eagle US 94
Side Charlie:
2x MRCH Fishing Vessel|15kts
Lady Erika
Lady Esmerelda
B. Implementation and Testing
Now that the storyline, map, and OoB have been determined, the following lessons will deal with implementation.
Some scenario designers find it helpful to outline their plans on paper before translating them into the game.
Summary: The five basic questions behind the conflict are answered and the geography and OoB has been set.
Load Lesson 42: Map Generation
Open the Windows >> Orders screen and keep it open throughout this Lesson
Following this lesson, the user should be able to:
1. Generate a new scenario map
2. Set start date
3. Set start time
4. Set duration
5. Set map boundaries
6. Computer generated weather
Under the Edit pull-down menu, issue the Export Text Data command. In the Save Scenario Information dialog box, enter Orders.SCT, and click OK. This file will be used later in the Lesson.
1. Generate a new scenario map
From the Edit pull-down menu, select the New Scenario command. This will bring up the Scenario Data Selection dialog box. From here, you will set the scenario start time and date, the duration, map latitude and longitude, and the type of map projection.
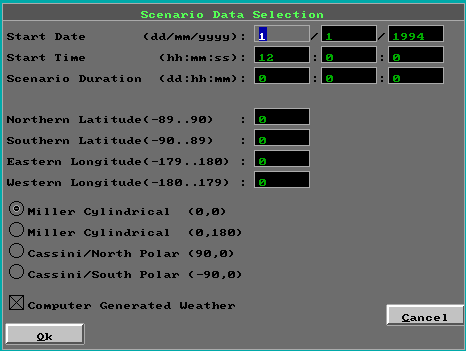
2. Set starting date
The dd/mm/yyyy represents the starting day, month, and year. Enter 19, 3, and 1995 for the starting date. The starting date is important because it can determine which units are available for inclusion in the scenario.
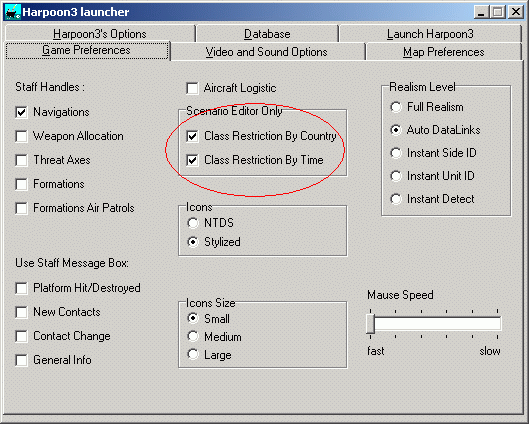
Two options are available in the Harpoon3.ini file called ClassRestrictionByCountry and ClassRestrictionByTime. If both options have been turned ON, then only those units in service at the start of the scenario will be offered for insertion. The Harpoon3.ini file can be edited by any text editor. Restriction by Country/Time can also be enabled by the H3, ANW, or HUE Launchers under the Game Preferences Tab.
In H3, it is not possible to create a scenario before 1976 as the coastline and country border data only covers 1976 to 1994.
In ANW and HUE, it is not possible to create a scenario before 1900 or after 2154.
3. Set starting time
The hh/mm/ss stands for hours, minutes, and seconds. Hours are entered according to the military clock from 0 to 24. Time is measured according to ZULU, or the Greenwich Mean Time [GMT] zone. A map of the world time zones is included in the Harpoon3 manual. A scenario centred on Germany [GMT+1] and set to start at 1300h local time, will have 12:00:00 entered as the start time.
For this Lesson, enter 01:00:00Z for the start time.
ANW and HUE observe Daylight Savings Time. H3 does not. Therefore, start times may appear one hour different from the file value if the computer running ANW or HUE is set to observe DST.
4. Set duration
The dd/hh/mm stands for days, hours, and minutes. Time should be set to allow for completion of all scenario objectives. A strict time limit can increase player difficulty. A non-zero duration must be entered, but this can be modified later. For this Lesson, enter duration as 1 day.
5. Set map boundaries
Values for map boundaries are measured in degrees of Latitude and Longitude. A world map has been included with the Harpoon3 manual.
For this Lesson, use:
Northern Latitude: 70
Southern Latitude: 60
Eastern Longitude: - 5
Western Longitude: -30
This will generate a map 10x25 degrees centred on Iceland.
When in doubt regarding map size, always make a map larger than necessary as it cannot be changed.
Map projection is a means of representing a globe on a two-dimensional Harpoon tactical display. There are two types: Miller Cylindrical and Cassini Polar. A good description of each can be found in the manual.
The area around Iceland does not include much of the North Polar region. Select the radio button for Miller Cylindrical (0,0).
6. Computer generated weather
If enabled, weather conditions are generated along with the map and are affected by region, season, and time of day. Large maps have more variation in weather patterns. Weather changes during the game. Leave the option enabled.
Open and read the Orders.SCT text file that was generated at the start of this Lesson for the final instructions to this Lesson because the Orders Window will be erased once OK is clicked.
Hit OK. Issue the File >> Save As command and save the map as MAP.SCN
Enter "ICELAND" in the Scenario Name and "Iceland Tutorial Scenario" in the Scenario Description fields.
Load Lesson 43: Creating Sides
Open the Window >> Orders screen and keep it open throughout this Lesson
Use the Edit >> Export Text Data command and use the generated text file to complete this Lesson. Later in the Lesson, it will be difficult to scroll the Orders window and read the instructions.
Following this lesson, the user should be able to:
1. Create a new side
2. Write orders
1. Create a new side
A maximum of 65535 sides is possible in any scenario. Each side can be assigned to the AI or be under player control. However, each additional side creates additional complexity and demand on CPU and memory. This Tutorial will only use three sides: Alpha, Bravo, and Charlie.
Select Sides command from the Edit pull-down menu to activate the Sides Maintenance window.
Click on the Add Side button.
When the New Side dialog box appears, enter "Alpha" and hit OK.
The word Alpha now appears on both sides of the Side Maintenance window. The left panel of the window lists the sides currently in the game. The right side of the window lists their orders.
Click on Add Side and type in "Bravo" to create it. Repeat this step and create a side for "Charlie".
Once created, side names cannot be modified. To delete a side, click on the side from the left panel and hit the Del Side button.
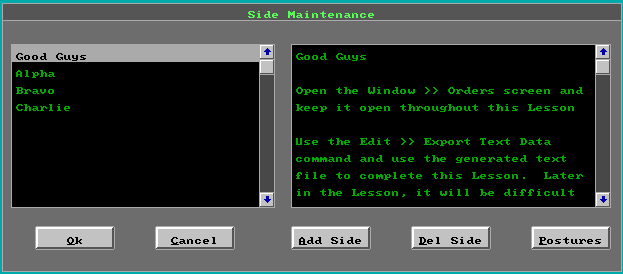
2. Write orders
Select Alpha from the left panel. Alpha should also appear in the right panel. The right panel is where the orders for the selected side are displayed.
Click on the word Alpha in the right panel and a blinking cursor will appear. The right panel is a text editor used to enter orders for the selected side. Use either the Backspace key or the Delete key to remove the word Alpha. Type in the following:
Orders for Cmdr Alpha Operations
Click on Bravo from the left panel and repeat the process used for Alpha side. Type in:
Orders for Cmdr Bravo Operations
These two lines will serve as placeholders for the orders text. Later in the Tutorials, additional text will be added to the orders for both Alpha and Bravo sides. Do not enter any orders for Charlie side. Click on OK.
Summary:
The number of sides in a scenario is virtually limitless, but each additional side creates demands on processing power. Each side has its own specific orders.
Use the File >> Save As command and save the file as SIDES.SCN
Load Lesson 44: Setting Postures
Open the Windows >> Orders screen and keep it open throughout this Lesson
Use the Edit >> Export Text Data command and use the generated text file to complete this Lesson. Later in the Lesson, it will be difficult to scroll the Orders window and read the instructions.
Following this lesson, the user should be able to:
1. Set postures for sides
If Lesson43 was followed precisely, Lesson44 should be a virtual duplicate of the SIDES.SCN file saved at the completion of Lesson43 (with the exception of the Good Guys side containing the orders).
There are three possible postures for each side towards each and every other side: friendly, neutral, and hostile. A posture defines the side's attitude towards the other sides and determines whether units will attack a contact (hostile), volunteer and share sensory information (friendly), or neither (neutral). The default display setting for friendly units is blue, neutral is green, and hostile is red.
Postures are not automatically reciprocal. Side Alpha may be friendly towards Bravo, but Bravo is not necessarily friendly towards Alpha.
A side should not hold a friendly posture towards any side that it considers an enemy and needs to attack. A friendly posture means that it would transmit data for its location to the side it needs to attack. The game prevents sides that share a friendly posture from attacking each other. However, the Scenario Editor allows for this possibility to exist and there are many advanced design techniques that deliberately utilize this unique ability to prevent or delay combat. Future tutorial sessions will deal with these techniques.
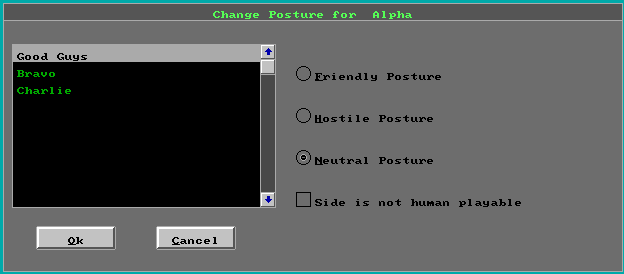
Select side Alpha from the left panel of the Side Maintenance window and click on the Postures button.
The Change Posture window will now appear and the left panel will now show all the other sides (except Alpha). With Alpha selected, you will define Alpha's stance towards all the other sides.
Good Guys side is highlighted. The Change Posture window automatically selects the first side on the list and assigns Neutral as the default posture. Neutral means that Alpha will not send any data to Good Guys. Select Bravo from the left panel.
Change Alpha's posture towards Bravo by selecting the Hostile radio button and then clicking on Bravo in the left panel to confirm this assignment.
Alpha's posture towards Charlie needs no change since the default posture is Neutral.
Hit OK to leave the Change Postures window for Alpha.
Select side Bravo from the left panel of the Side Maintenance window. Hit the Postures button, change the posture of Bravo towards Alpha by clicking on Alpha from the left panel, clicking on the Hostile Posture radio button, and then clicking on Alpha to confirm the change.
While still in the Change Postures window, select Charlie from the left panel and change Bravo's posture to Friendly towards Charlie. Click on Charlie to confirm this change and hit OK to exit.
Select Charlie in the left panel of the Side Maintenance window. No orders were typed for Charlie because Charlie is meant to be a computer-only controlled side. Click on the Postures button and enable the box labeled, "Side is not human playable."
Set the posture of Charlie as friendly towards Bravo by selecting Bravo in the left panel, clicking the radio button next to Friendly posture, and then clicking Bravo to confirm the change. Charlie is neutral towards Alpha by default. Hit OK to exit.
Summary:
Postures adds a 'political' element to the conflict. Use of postures can simulate very complex situations involving many sides. Sides sharing a friendly posture will be unable to attack each other.
Delete the side for Good Guys and use the File >> Save As command to save the file as POSTURES.SCN
Load Lesson 45: Creating an air base
Lesson 45 Creating an Air Base
Open the Windows >> Orders screen and keep it open throughout this Lesson
Following this lesson, the user should be able to:
1. Add facilities
If Lesson44 was followed precisely, Lesson45 should be a virtual duplicate of the POSTURES.SCN file saved at the completion of Lesson44 (with the exception of the Good Guys side containing the orders).
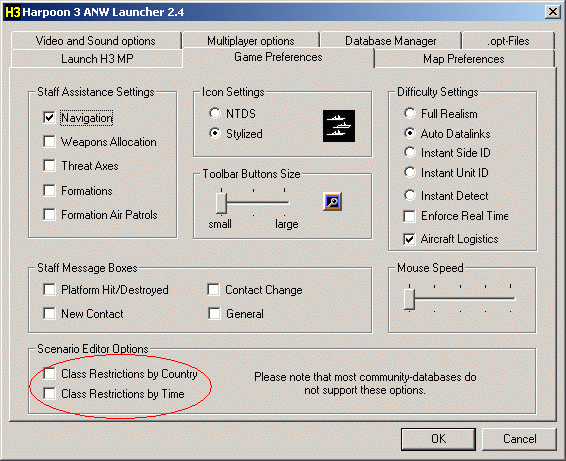
For the purpose of this Tutorial, ensure that both the ClassRestrictionByCountry and ClassRestrictionByTime options have been disabled when the Scenario Editor was started. Otherwise, results will be erroneous for these Tutorial Lessons.
Open the Side Maintenance window from the Edit pull-down menu and select Bravo from the left panel and click OK.
Go to the zoom map window named Bravo.
Under the Edit menu, select Units >> Add a Unit or use the Insert hotkey from the keyboard (not NumPad0). The cursor will now appear as a hand and pointed finger. Click near RefPt Keflavik and a unit will be inserted at that location. The Select Unit Type dialog box will appear. The dialog box is sensitive to the terrain selected for the unit insertion.
Eligible unit types over land are:
Aircraft (already airborne)
Facility (individual land unit)
Installation (pre-fabricated base)
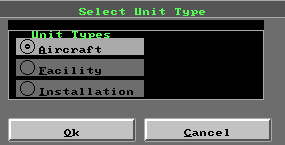
Eligible unit types over sea are:
Aircraft (already airborne)
Ship (surface vessel)
Submarine (subsurface unit)
A Base is a group of facilities. Instead of selecting the Installation radio button which would insert a fully pre-fabricated base, select the radio button for Facility and hit OK to build up the base group one component at a time. Scroll down until the
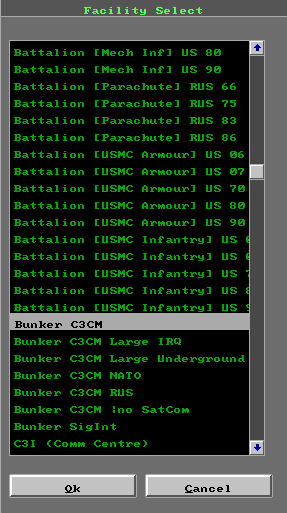
Bunker C3CM
is found. Click on it and hit OK.
The bunker will now appear on the map. As the first unit inserted for side Bravo, the bunker has the flagship indicator. If it does not, select the unit and use the Settings pull-down menu and issue the Set Flagship command.
Turn on the Range and Bearing function (NumPad5 hotkey) and repeat the insertion method until all five units from the Lesson41 OoB have been placed within a cluster approximately 2nm wide. The remaining units to be inserted are:
C3I (Comm Centre)
Radar NATO
A/C Runway (8k ft)
A/C Hangar Large (32 VL)
A/B Ammo Dump
The minimum requirement for an air base is a runway and an aircraft-holding facility, a hangar in this case.
Once all six facilities have been inserted, drag-select all of them and group them together with the g-hotkey. Toggle between NumPad9 to see group and unit display. In group view mode, the facilities will be replaced by a single base icon.
Add one last facility. Place a
SAM MIM-104C Patriot Bttn US 90
slightly north of the group.
All land facilities start with Auto-detection enabled. This means that all sides will know their exact location once the scenario starts. This can be turned off by the Home key (not NumPad7). Select the SAM unit and hit the Home key. Notice that the word AUTO disappears.
Click on the SAM unit and then select the Edit >> Units >> Move a Unit command. The cursor once again turns into a hand. Shift the SAM unit so that it resides east of the base.

Summary:
Land units are inserted and grouped together to form an air base and the auto-detection level of individual facilities can be changed. Delete the side for Good Guys and use the File >> Save As command to save the file as AIRBASE.SCN
Load Lesson 46: Adding base aircraft
Lesson 46 Adding base aircraft
Open the Windows >> Orders screen and keep it open throughout this Lesson
Following this lesson, the user should be able to:
1. Add aircraft to a base
2. Load a magazine / ammo dump
If Lesson45 was followed precisely, Lesson46 should be a virtual duplicate of the AIRBASE.SCN file saved at the completion of Lesson45 (with the exception of the Good Guys side containing the orders).
For the purpose of this Tutorial, ensure that both the ClassRestrictionByCountry and ClassRestrictionByTime options have been disabled when the Scenario Editor was started. Otherwise, results will be erroneous for these Tutorial Lessons.
1. Add aircraft to a base
Open the Side Maintenance window from the Edit pull-down menu and select Bravo from the left panel and click OK.
Go to the zoom map window named Bravo.
Edit Aircraft
There are two ways of placing aircraft into a scenario.
A) The Edit >> Add a Unit >> Aircraft command will insert an airborne plane directly into the scenario not unlike the process for a facility.
B) The Edit >> Units >> Edit Aircraft command will insert aircraft directly into an aircraft-holding ship or facility.
Ensure that the Unit Display mode is enabled and click on the
A/C Hangar Large (32 VL)
facility then, under the Edit menu, select Units >> Edit Aircraft command.
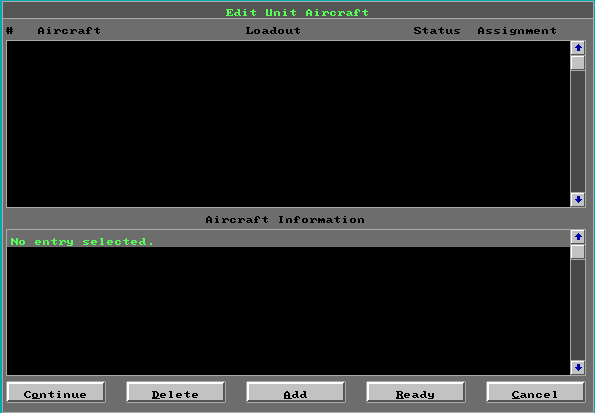
The Edit Unit Aircraft window will appear. Select the Add button to bring up the Select Plane Type dialog box. This is a list of aircraft available for placement into the scenario and will only display those aircraft that fit the requirements of the unit according to size and purpose. Some aircraft may not be added to ships.
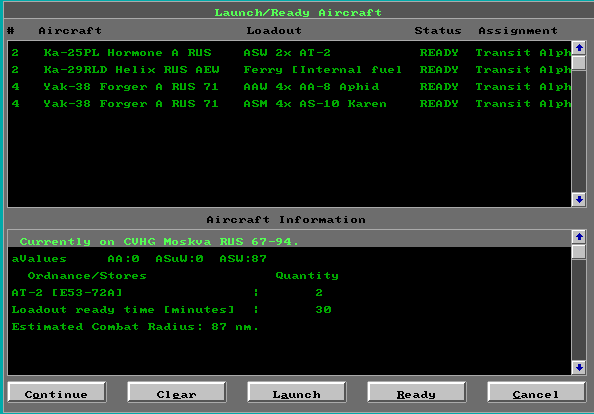
Find and select the F-15E Strike Eagle US 94 then click on OK. A box will appear asking you how many F-15E to add. The default is determined by the capacity of the unit. Change the number to 16 and click on OK.
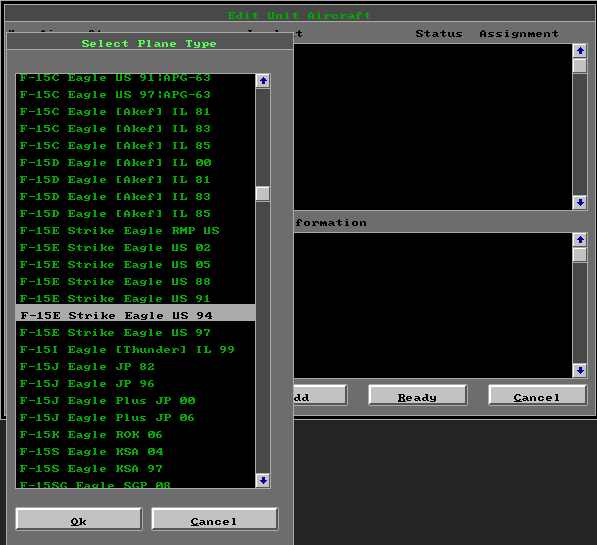
Click on the Ready button to arm the aircraft then select the
AAW LR 6x AIM-120 AMRAAM
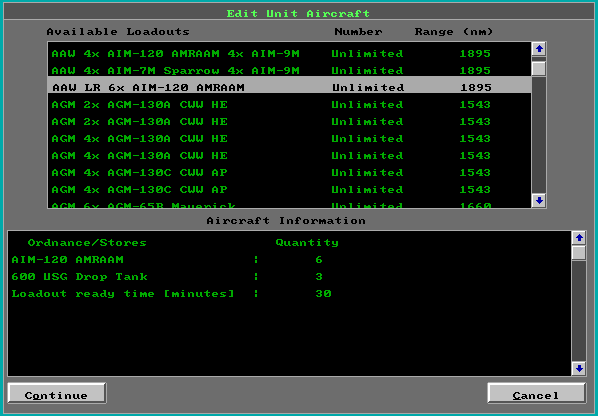
loadout and click on Continue. When prompted with "How Many?", click OK to load all sixteen aircraft.
A new dialog box asking "Minutes to Ready?" will appear wth the default time of 30 minutes (ANW and HUE users will see -1 in lieu of 30 minutes). This is the amount of time the selected aircraft will require to ready the first loadout once the scenario begins. Each subsequent loadout will only require the ready time as set by the database editor for that particular plane. Enter 0 and click on OK.
Hit the Ready button, again. This time, select the
AGM 4x AGM-130A CWW HE
loadout. This loadout has
4x AIM-120 AMRAAM
4x AGM-130A CWW [HE] missiles.
Click Continue. When asked, "How Many?", enter 8 and click on OK. Enter 0 when asked "Minutes to Ready?" and click on OK. Click on the Continue button to finish.
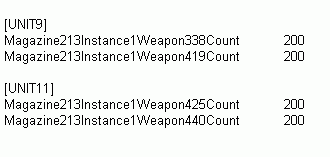
2. Load a magazine / ammo dump
While in Unit Display mode, select the
A/B Ammo Dump
facility and click on the Logistics button (F5 hotkey) twice to bring up the Reload Weapon Selection window. [ANW users will see the Edit Unit Weapons window]. The list of Magazine Weapons is in the bottom right-hand corner. Scroll down to find the
AIM-120 AMRAAM
entry and click on it.
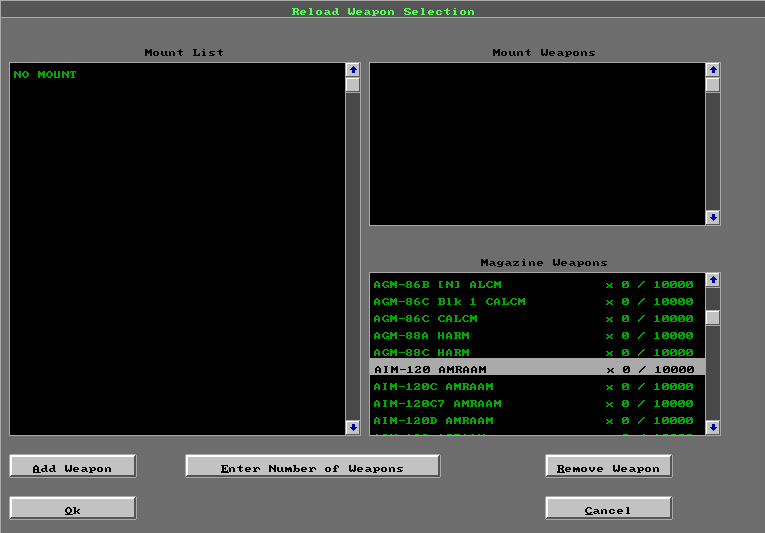
Add weapons individually with the "Add Weapon" button or use the "Enter Number of Weapons" button and enter a value of 200 to add those weapons to the magazine and click on OK. Find the
AGM-130A CWW [HE]
weapons and add 200 of them in the same manner. Click OK to complete the process.
Summary:
Aircraft have been added to the base and prepared with their initial loadouts. Additional aircraft munitions have been added to the ammo dump. Delete the side for Good Guys and use the File >> Save As command to save the file as LOADOUTS.SCN
Load Lesson 47: Adding ships
Open the Windows >> Orders screen and keep it open throughout this Lesson
Following this lesson, the user should be able to:
1. Add ships
If Lesson46 was followed precisely, Lesson47 should be a virtual duplicate of the LOADOUTS.SCN file saved at the completion of Lesson46 (with the exception of the Good Guys side containing the orders).
For the purpose of this Tutorial, ensure that both the ClassRestrictionByCountry and ClassRestrictionByTime options have been disabled when the Scenario Editor was started. Otherwise, results will be erroneous for these Tutorial Lessons.
Open the Side Maintenance window from the Edit pull-down menu and select Alpha from the left panel and click OK.
Go to the zoom map window named Alpha.
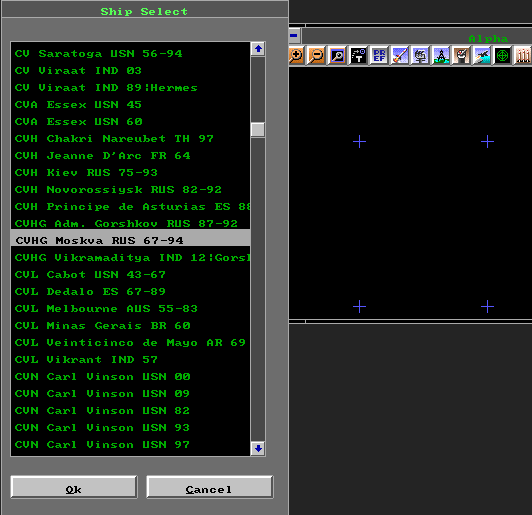
Use the Insert hotkey (not NumPad0) or the Edit >> Units >> Add a Unit command from the pull-down menu and click near RefPt Alpha. Select the radio button next to Ship and hit OK. Scroll down the list of offered ships and select the
CVHG Moskva RUS 67-94
and click on OK.
Enable the Range / Bearing function (NumPad5 hotkey) and add the
CG Slava RUS 90
(with the same process used for the Moskva) 10nm east of the CVHG.
Repeat the process and add the
BCGN Adm. Ushakov RUS 91
10nm to west of the CVHG.
Repeat the process and add the
LST Alligator Proj. 1171 RUS 64
10nm south of the CVHG. The process to group components together in the creation of a base is the same for the creation of a Task Force. Drag-select all four ships and hit the g-hotkey. Switch to Group Display mode to verify that the group has been created then return to Unit Display mode.
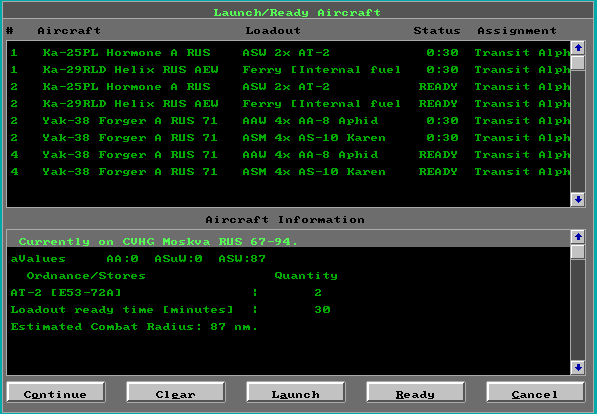
To add aircraft to the ships, select the Moskva and use the same procedure outlined in Lesson 46 to add aircraft to a hangar. Add
12 Yak-38 Forger A RUS 71
to the ship and give six of them the
AAW 4x AA-8 Aphid
loadout and give the remainder the
ASM 4x AS-10 Karen
loadout all twelve with a ready time of zero. Finally, add
3x Ka-29RLD Helix RUS AEW 81
with a
Ferry [Internal fuel]
loadout and 0 ready time
3x Ka-25PL Hormone A RUS 65-95 ASW
with an
ASW 2x AT-2
loadout and 0 ready time. Click on Continue.
Following the procedure in Lesson 46, load the ship's magazine with
200x AA-8 Aphid [R-60]
200x AS-10 Kh-25ML Karen [ASM]
Select the
CG Slava RUS 90
and add one
Ka-27 Helix A RUS 81
helicopter with an
ASW APR-2M
loadout and 0 ready time. Select the
BCGN Adm. Ushakov RUS 91
and add
3x Ka-25PL Hormone A RUS 65-95 ASW
helos with an
ASW 2x AT-2
loadout and 0 ready time.
Return to window Alpha and Group Display view. Select the group icon and set up the formation according to the procedure from Lesson 08: The Formation Editor.
Once formation patrol zones are assigned, click on the TF icon and use the Edit >> Units >> Move a Unit pull-down menu command to shift the TF ever so slightly. This will cause the ships to immediately move to their assigned patrol zones.
Open the Side Maintenance window from the Edit pull-down menu and select Charlie from the left panel and click OK.
Go to the zoom window named Charlie.
Go to the Edit >> Units >> Add a Unit pull-down menu command or use the Insert hotkey (not NumPad 0) and insert a
MRCH Fishing Vessel|15kts
near RefPt Charlie. Select the ship and ensure that NumLock is OFF. Use the NumPad7 hotkey to re-name it to "Lady Erika".
Repeat the process, insert a second
MRCH Fishing Vessel|15kts
and re-name it to "Lady Esmerelda".
Summary:
Ships have been added along with their air complements, armed with their initial loadouts, and magazines have been loaded.
Delete the side for Good Guys and use the File >> Save As command to save the file as ADDSHIPS.SCN
Load Lesson 48: Alternate starting pts
Lesson 48 Alternate Start Points
Open the Windows >> Orders screen and keep it open throughout this Lesson
Following this lesson, the user should be able to:
1. Set alternate starting points
2. Re-name reference points
If Lesson47 was followed precisely, Lesson48 should be a virtual duplicate of the ADDSHIPS.SCN file saved at the completion of Lesson47 (with the exception of the Good Guys side containing the orders).
For the purpose of this Tutorial, ensure that both the ClassRestrictionByCountry and ClassRestrictionByTime options have been disabled when the Scenario Editor was started. Otherwise, results will be erroneous for these Tutorial Lessons.
1. Set alternate starting points
Open the Side Maintenance window from the Edit pull-down menu and select Charlie from the left panel and click OK.
Go to the zoom map window named Charlie.
One of the useful features in the Scenario Editor for increasing scenario diversity is the Alternate Starting Location option. When a game starts, the computer randomly selects between a set of pre-determined starting locations.
Place three RefPts in a triangle around the Lady Erica approximately 10nm distant. Drag-select the three RefPts to make them active and then click on the Lady Erika. From the Edit pull-down menu, select the Units >> Set alternate location command. The Lady Erika will select between her current position and the three RefPts as starting locations whenever the file is opened through the Load Battleset function or with the Harpoon3 game.
Repeat the process with Lady Esmerelda and assign three different reference points as alternate starting locations. RefPts for alternate starting locations may not be shared between different units.
Switch sides to side Alpha and switch to zoom map Alpha. Ensure that the Group Display mode is selected and place three alternate starting points around the task force and assign them to the task force icon with the same procedure used for the individual ships.
Alternate starting points can be removed by selecting the unit and issuing the Edit >> Units >> Set alternate location command while no reference points are selected.
Alternate starting points may be set for any unit including individual land facilities, but not bases.
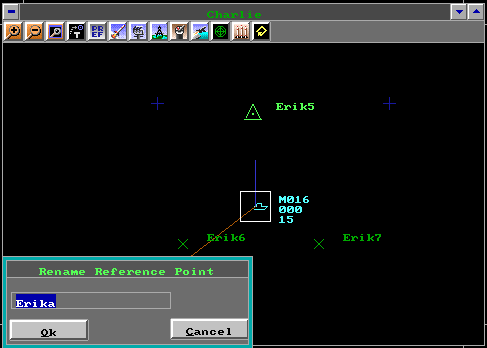
2. Naming reference points
A good practice when assigning alternate starting points is to name the RefPts for the unit to which they are assigned so that there is no confusion. RefPts can be re-named by first clicking on them to make them active, then using the Ctrl+NumPad7 hotkey.
Summary:
Alternative starting points have been set and re-named for all ships and task forces.
Delete the side for Good Guys and use the File >> Save As command to save the file as ALTSTART.SCN
Load Lesson 49: Missions
Open the Windows >> Orders screen and keep it open throughout this Lesson
Following this lesson, the user should be able to:
1. Assign missions
If Lesson48 was followed precisely, Lesson49 should be a virtual duplicate of the ALTSTART.SCN file saved at the completion of Lesson48 (with the exception of the Good Guys side containing the orders).
For the purpose of this Tutorial, ensure that both the ClassRestrictionByCountry and ClassRestrictionByTime options have been disabled when the Scenario Editor was started. Otherwise, results will be erroneous for these Tutorial Lessons.
Open the Side Maintenance window from the Edit pull-down menu and select Alpha from the left panel and click OK.
Go to the main map window named
Lesson 49 Missions
The manual has an extensive description of behaviour for the various missions. Therefore, only the missions used in this specific Tutorial will be covered in detail.
Ensure that the map is in Group View mode. As stated in Lesson41, the goal of this exercise is to simulate an invasion of Iceland. Therefore, the task force must reach Iceland.
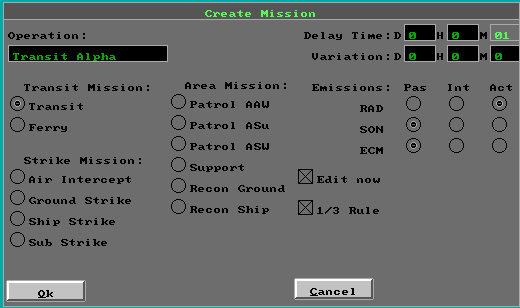
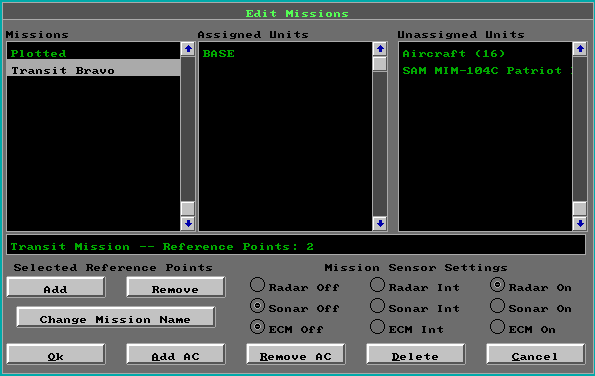
Drag-select the three RefPts named LZ south of Iceland and create a Transit mission named, "Transit Alpha" with a Delay Time of 1 minute and radar active. Select the Edit Now box and click on OK. The Mission Editor window will appear. The TF Alpha mission was just created thus it is the default. Select and assign the TF to it and click on OK.
Click on the TF and notice that "Transit Alpha" now appears next to Mission in the Group Status window.
When creating missions, it is always advisable to use a delay time of at least 1 minute so that the courses will be varied.
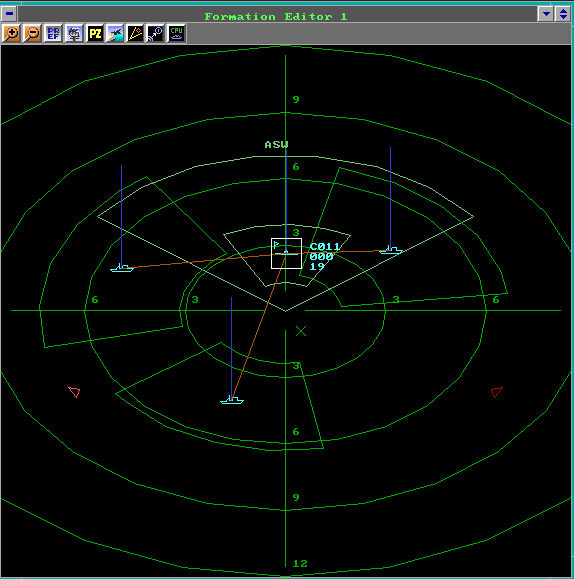
With the TF group selected, open the Formation Editor and assign:
CAP mission of
2x Yak-38 Forger A RUS 71
AAW 4x AA-8 Aphid ASW
dipping sonar patrol of
Ka-25PL Hormone A RUS 65-95 ASW
AEW patrol of
Ka-29RLD Helix RUS AEW 91
and an ASuW patrol of
2x Yak-38 Forger A RUS 71
ASM 4x AS-10 Karen
If necessary, review Lesson 08: The Formation Editor.
Open the Side Maintenance window from the Edit pull-down menu and select Charlie and go to zoom map window Charlie.
Select the four reference points named Transit and create a Transit mission named "Transit Charlie" with a delay of 1 minute and radar active. Assign Ladies Erika and Esmerelda to the mission and click on OK.
Open the Side Maintenance window from the Edit pull-down menu and select Bravo. Click on OK and go to zoom map window Bravo.
Select RefPt Bravo and create a Transit mission named "Transit Bravo" with no Delay Time and radar active.
Assign the group named BASE to it.
[ANW and HUE users must also assign all 16 available aircraft to the mission as a separate step. H3 users can ignore this step.]
Click on OK.
Select the group BASE and open the Formation Editor (F4). Create a CAP mission of:
2x F-15E Strike Eagle US 94
AAW LR 6x AIM-120 AMRAAM.
Create an ASuW mission with
2x F-15E Strike Eagle US 94
ASM 4x AGM-130A CWW [HE]
It appears odd that an immobile base is assigned to a Transit mission. However, the unique properties of the mission demand and allow for this situation. Groups that are assigned a Transit mission grant the AI greatest flexibility within the game. Assigned groups and bases will detach their formation aircraft patrols to investigate or prosecute contacts autonomously.
Summary:
Transit missions and formation patrols have been set for all sides.
Delete the side for Good Guys and use the File >> Save As command to save the file as MISSIONS.SCN
Load Lesson 50: Victory Conditions
Lesson 50 Victory Condition Levels
Open the Windows >> Orders screen and keep it open throughout this Lesson
Following this lesson, the user should be familiar with:
1. Victory Conditions overview
2. ViCond Levels
3. Modify or delete objectives
If Lesson49 was followed precisely, Lesson50 should be a virtual duplicate of the MISSIONS.SCN file saved at the completion of Lesson49 (with the exception of the Good Guys side containing the orders).
1. Victory Conditions overview
Victory Conditions (hereafter referred to as ViConds) are how the player and game measures success. Fulfillment of the ViConds is the aim. The general goals laid out in Lesson41
Alpha will be victorious if it simulates landing troops on Iceland
Bravo will succeed if it can prevent the invasion by destroying key enemy units
must be translated into ViCond terms that the game can understand and evaluate.
2. Levels
Victory Conditions exist as a logic decision tree and consists of a group of Levels. A Level is a group of individual scenario objectives.
There are four types of scenario objectives:
Damage
Protect
Station
Protect Station
Damage:
Damage or destroy a list of units
Protect:
Prevent damage to a list of units
Station:
Get selected units to a location
Protect Station
Prevent the enemy from getting selected units
to a location
Open the Side Maintenance window from the Edit pull-down menu, select Good Guys, from the left panel, and click OK. Select Victory Conditions from the Edit pull-down menu. An example of the default Top Level appears and is comprised of five individual objectives in the left panel:
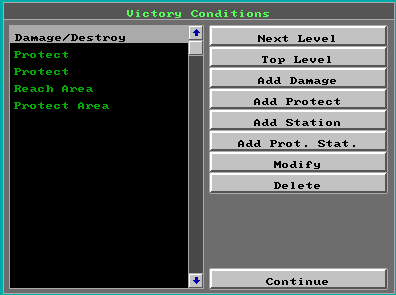
Damage/Destroy
Protect
Protect
Reach Area
Protect Area
Note that multiples of each type are possible. One Protect objective might be for ships while the other could specify aircraft.
If all five objectives are fulfilled, this Level would be evaluated by the game as 'completed' and award the player victory. Failure to accomplish any of the objectives within a Level means that the Level is incomplete. Logically speaking, all the objectives within a Level are connected by the 'AND' conditional statement.
Click on the Next Level button to move down to the next Level and its group of scenario objectives.
In this Level, there is a single objective:
Damage/Destroy
If the player fulfills this objective, the Level is completed and victory is awarded.
Completion of either the five objectives from the Top Level OR the single objective from this Level means that the player wins. Therefore, Levels are connected by the logical connector "OR".
3. Modify or delete objectives
Click on the Damage/Destroy objective. Users wishing to modify this objective would then click on the Modify button in order to change it.
Instead, click on the Delete button to remove this scenario objective. Click on the Top Level button to move back to the Top Level. Click on Continue to leave the ViCond dialog box.
Summary:
There are four basic types of scenario objectives that can be grouped together in Levels. Each Level is connected to every other Level by the 'OR' conditional statement.
Delete the side for Good Guys and use the File >> Save As command to save the file as LEVELS.SCN
Load Lesson 51: ViCond Parameters
Open the Windows >> Orders screen and keep it open throughout this Lesson
Following this lesson, the user should be able to:
1. Set Victory Condition parameters
2. Set damage objective
If Lesson50 was followed precisely, Lesson51 should be a virtual duplicate of the LEVELS.SCN file saved at the completion of Lesson50 (with the exception of the Good Guys side containing the orders).
1. Set Victory Condition parameters
Open the Side Maintenance window from the Edit pull-down menu and select Bravo from the left panel and click OK. Select Victory Conditions from the Edit pull-down menu.
There are four types of scenario objectives:
Add Damage
Add Protect
Add Station
Add Protect Station
2. Set damage objective
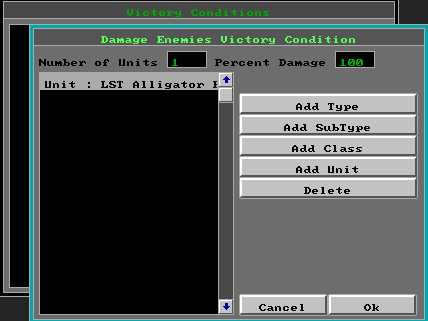
Each objective uses common parameters. Click on Add Damage to create an objective and bring up the Damage Enemies Victory Condition dialog box.
The Number of Units specifies the number of units that must be damaged to satisfy this objective. Leave the value at one.
Percent Damage sets the amount of damage required on each of the Number of Units to satisfy this objective. 100% means total destruction of the Number of Units. Leave it at 100.
The four buttons:
Add Type
Add SubType
Add Class
Add Unit
indicate increasing levels of specificity. Click on Add Type to see that there are four very generic options:
Ship
Sub
Aircraft
Facility
If Ship is selected, the destruction of any hostile ship in the scenario will satisfy this very broad category. Click on Cancel.
Click on SubType and the Select Class ID dialog box appears showing:
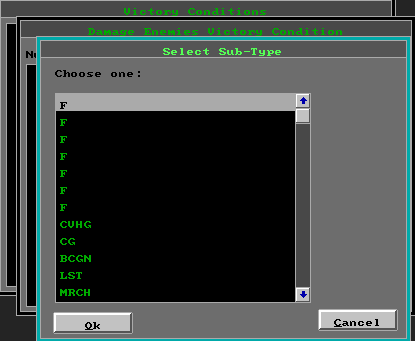
F
F
F
F
F
F
F
CVHG
CG
BCGN
LST
MRCH
MRCH
The seven F listings represent the seven facilities added to side Bravo.
The list indicates all units within the scenario. Selection of any category such as MRCH would mean that all units of sub-type MRCH (Merchant vessels) would satisfy this objective. Click on Cancel.
Click on Add Class to bring up the Select SubType dialog box and see the same list of units within the game presented in the same order. However, there is additional detail. Once again, if the Lady Erica entry is selected, BOTH Lady Erica and Lady Esmerelda would satisfy this condition because both are the same class of ship:
MRCH Fishing Vessel|15kts
Click on Cancel.
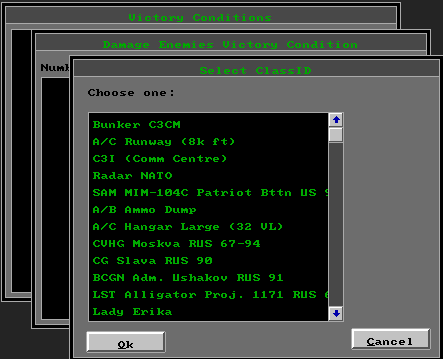
Click on Add Unit to bring up the Select Unit dialog box. The same list of units previously offered appears. Click on the:
LST Alligator Proj. 1171 RUS 64
and it should appear in the left panel of the Damage Enemies ViConds dialog box as:
Unit: LST Alligator Proj. 1171 RUS 64
(some of the name will not be visible). If it does not appear, click on the left panel. This unit, and ONLY this unit, will satisfy the objective. If a scenario has many units with the exact same name, the game can differentiate between them. Only the destruction of this exact unit will satisfy the objective. If the unit is later re-named to:
LST Alligator
it will no longer satisfy this objective.
Although the lists display and offer all units within a scenario, only those units which are Hostile to this side will be checked in the game.
If a unit has been erroneously selected, click on it and hit the Delete button. Otherwise, click on OK.
A Damage/Destroy objective should now appear in the ViCond dialog box. If it does not, click on the left panel. Click on Continue to leave the ViCond dialog box.
Summary:
There are four basic types of scenario objectives and they share common parameters. A Damage objective only checks for units that are hostile to the given side.
Delete the side for Good Guys and use the File >> Save As command to save the file as DAMAGE.SCN
Load Lesson 52: ViCond Protect
Open the Windows >> Orders screen and keep it open throughout this Lesson
Following this lesson, the user should be able to:
1. Add protect objective
2. Test ViCond evaluation
If Lesson51 was followed precisely, Lesson52 should be a virtual duplicate of the DAMAGE.SCN file saved at the completion of Lesson51 (with the exception of the Good Guys side containing the orders).
1. Add Protect objective
Open the Side Maintenance window from the Edit pull-down menu and select Bravo from the left panel and click OK. Select Victory Conditions from the Edit pull-down menu.
Click on Add Protect. The Protect Friendlies Victory Condition dialog box will appear with the same four category options:
Add Type
Add SubType
Add Class
Add Unit
The buttons will offer the same list of eligible units as before, but only units that share a friendly posture with Bravo will be checked. Selection of Neutral or Hostile units is allowed, but will not be evaluated by the game.
Enter 7 for the Number of Units and click on Add Type.
Click on Facility from the list.
A second objective will appear in the left panel of the Victory Conditions dialog box.
This objective means that no more than 6 facilities can be fully destroyed. Otherwise, the Bravo player will fail this objective.
[Note: ViConds are checked every 30 minutes during a game. This means that if there was no Damage/Destroy objective and the scenario was played from Bravo side, victory would be granted after 30 minutes. For this reason, the Protect objective is usually used in conjunction with other objectives.]
Click on OK and then Continue to leave the Victory Conditions dialog box.
2. Test ViCond evaluation
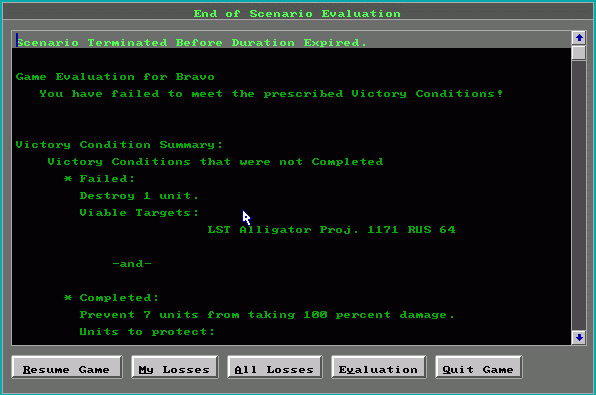
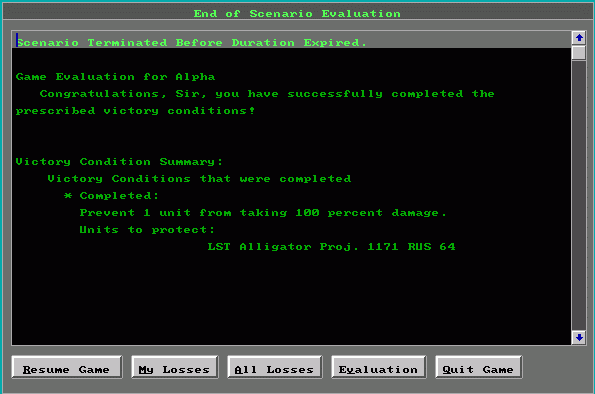
It is possible to test how ViConds will evaluate from the Scenario Editor. Under the File pull-down menu, select Resign and the Evaluation window will appear and show the current status of each ViConds for Bravo. Click on Continue and then Resume Game to return.
Open the Side Maintenance window from the Edit pull-down menu and select Alpha then click on OK. Select Victory Conditions from the Edit pull-down window.
Click on Add Protect. The Protect Friendlies Victory Condition dialog box will appear with the same four categories.
Click on Add Unit and select:
LST Alligator Proj. 1171 RUS 64
Click on OK.
Click on Continue to leave the Victory Condition dialog box.
Test the ViConds by resigning. Note that the objective evaluates as complete. Because the game checks every 30 minutes, a second ViCond objective is needed for side Alpha. Click Continue and then Resume Game.
Summary:
Protect objectives are the same as Damage objectives except they only evaluate with friendly units. ViConds are evaluated every 30 minutes.
Delete the side for Good Guys and use the File >> Save As command to save the file as PROTECT.SCN
Load Lesson 53: ViCond Station
Open the Windows >> Orders screen and keep it open throughout this Lesson
Following this lesson, the user should be able to:
1. Add Station objective
2. Test ViCond evaluation
3. Add second Level objective
If Lesson52 was followed precisely, Lesson53 should be a virtual duplicate of the PROTECT.SCN file saved at the completion of Lesson52 (with the exception of the Good Guys side containing the orders).
1. Add Station objective
Open the Side Maintenance window from the Edit pull-down menu and select Alpha from the left panel and click OK. Select Victory Conditions from the Edit pull-down menu.
Click on Add Station. The On Station Victory Condition dialog box will appear with the same four category options:
Add Type
Add SubType
Add Class
Add Unit
The buttons will offer the same list of eligible units as before, but only units that share a friendly posture with Alpha will be checked. Selection of Neutral or Hostile units is allowed, but will not be evaluated by the game.
Two additional buttons are also present:
Relative
Set Poly
Click on the Relative button and note how it toggles to Absolute. This button applies to the Start and Delta Time fields. The primary difference between the two states is the Start Time. If Relative is selected [appears], the clock counter for the scenario objective starts when the unit(s) arrive within the designated area. In an Absolute scenario objective, the clock starts after the time listed in the Start Time field has elapsed. For example, an Absolute Start Time of 6 hours means that the scenario objective is not evaluated until 6 hours has elapsed in the scenario.
Delta Time is the length of time the listed unit(s) must remain in the designated area. This is a single contiguous duration and not the sum of fragments spent in and out of the designated area.
Set Poly designates the area for this objective.
From the Window pull-down menu, select the Alpha zoom map window and open it. There are three RefPts named LZ shown. In a single action, drag-select an area that just covers the three RefPts. The box will disappear immediately, but the Scenario Editor will remember it.
Click on the On Station Victory Condition dialog box. Click on the Set Poly button.
Enter 1 for the Number of Units, 4 hours for the Delta Time, click on SubType, select the LST, and click on OK.
This means that the player must have the LST arrive within the designated area and stay there for four continuous hours. Ensure that the scenario duration is set so that this outcome is possible. Modification of scenario duration will be covered in future Lessons.
A second objective will appear in the left panel of the Victory Conditions dialog box.
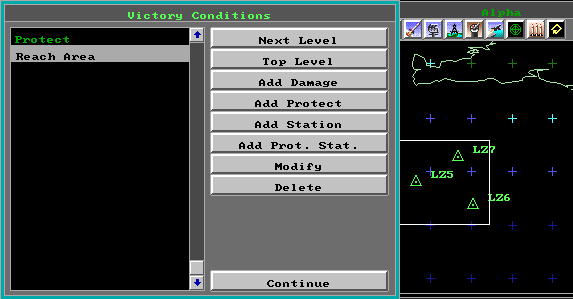
Reach Area
[Note: ViConds are checked every 30 minutes during a game. This means that if there was no Reach Area objective and the scenario was played from Alpha side, victory would be granted after 30 minutes. For this reason, the Protect objective is usually used in conjunction with other objectives.]
Click on Continue to leave the Victory Condition dialog box.
2. Test ViCond evaluation
Under the File pull-down menu, select Resign and the Evaluation window will appear and show the current status of each ViCond for Alpha. Click on Continue, then Resume Game to return.
3. Second Level objective Open the Side Maintenance window from the Edit pull-down menu and select Bravo then click on OK. Select Victory Conditions from the Edit pull-down window.
Click on Next Level and then Add Damage. The Damage Enemies Victory Condition dialog box will appear.
Click on Add Unit and select:
CG Slava RUS 90
Click on OK. Click on Continue to leave the Victory Condition dialog box.
Summary:
The On Station objective is similar to the Damage & Protect objectives except it needs a designated area to evaluate with friendly units.
Delete the side for Good Guys and use the File >> Save As command to save the file as STATION.SCN
Load Lesson 54: ViCond Protect Station
Lesson 54 ViCond Protect Station
Open the Windows >> Orders screen and keep it open throughout this Lesson
Following this lesson, the user should be able to:
1. Modify scenario duration
2. Re-set elapsed time
3. Avoid Protect Station
objective
If Lesson53 was followed precisely, Lesson54 should be a virtual duplicate of the STATION.SCN file saved at the completion of Lesson53 (with the exception of the Good Guys side containing the orders).
1. Modify scenario duration
Open the Side Maintenance window from the Edit pull-down menu and select Alpha from the left panel and click OK.
From the Window pull-down menu, select the main map window, Lesson 54 ViCond Protect Station, and open it.
From Lesson 53, we know that the Alpha player must have the LST arrive within the designated area and stay there for four continuous hours.
Ensure that the Message window is open and turn on the Range/Bearing function (NumPad5) to check the distance Alpha TF must travel to reach the LZ RefPts. The distance is approximately 300nm from the most distant Alternate Start point. The cruise speed of the TF is 9kts. A good rule of thumb is to deduct 5kts from the maximum speed to allow units within the formation to adjust and re-position themselves.
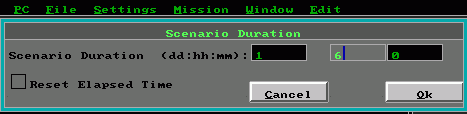
Therefore, the minimum scenario duration should = 300 / 4 + 4hrs = 79 hours. A designer can make the scenario more challenging by restricting this variable. Instead of allowing Alpha player 79 hours, the scenario will only last 30 hours. This will force Alpha to move at a minimum average speed of 13 knots.
The current scenario duration is 24 hours. Under the Edit pull-down menu, select Scenario Duration and change the values from 1 day to 1 day and 6 hours.
Check the time requirements for the other sides, too. Bravo side only has aircraft, but they have re-arm / ready periods of 6 hours so they will can fly 5-6 strike sorties in this time period. This is deemed satisfactory.
2. Re-set elapsed time
Enabling this box will re-set the start time for all internal applications of the scenario. This feature allows a designer to start the scenario in the Scenario Editor and run for some time before stopping it and re-setting the time back to the original parameter. The player would then have the full 30 hours to complete his objectives.
Unfortunately, this feature causes many potential problems. If an absolute start time is set for a ViCond objective, the Re-set feature will not restore it and a conflict will arise. Also, if the scenario is modified or used in future versions, all manner of problems arise. This function is best avoided whenever possible.
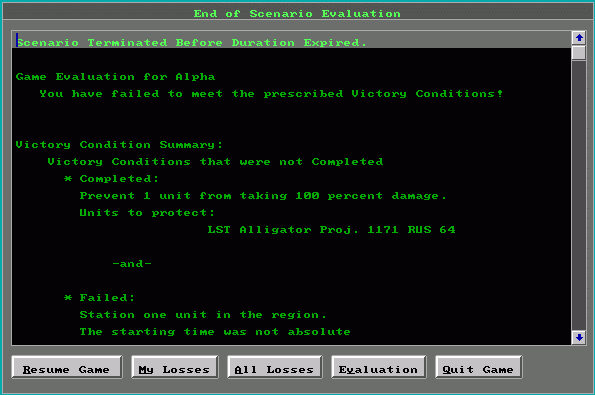
3. Avoid Protect Station objective
The Protect Station objective works in a manner similar to the Station objective. Instead, it evaluates according to which hostile ships are kept out of a designated area. Unfortunately, this objective is very buggy and unrealiable in H3, ANW, and HUE. Its use is best avoided whenever possible.
Summary:
On Station and Protect Station objectives are similar in that they need a designated area to evaluate with friendly or hostile units, respectively. Due to its bugginess, the Protect Station objective should be avoided whenever possible. Check the scenario duration to ensure that each side has sufficient time to accomplish its objectives. Side Charlie is AI-controlled and thus has no need for ViConds.
Delete the side for Good Guys and use the File >> Save As command to save the file as PROTSTAT.SCN
Load Lesson 55: Show All
Open the Windows >> Orders screen and keep it open throughout this Lesson
Following this lesson, the user should be able to:
1. Use Show All
2. Change start date and time
3. Copy threat
poly 4. Lock and unlock reference points
If Lesson54 was followed precisely, Lesson55 should be a virtual duplicate of the PROTSTAT.SCN file saved at the completion of Lesson54 (with the exception of the Good Guys side containing the orders).
1. Use Show All
On the Edit pull-down menu, there is a function called, Toggle Show All [ON / OFF]. This option reveals all the units for all sides currently in the scenario. Click on the map after engaging this Toggle so that the map re-draws itself.
![]()
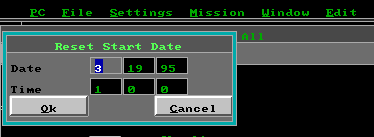
2. Change start date and time
Under the Edit pull-down menu is the Reset Date/Time command. [ANW & HUE users will see Change Start Date and Time]. This function changes the starting time for the scenario. If the Game Status window is open and does not reflect the change, close the window and re-open.
3. Copy threat poly
This command copies an existing Nav Zone Threat polygon from one side to all the other sides of the scenario. Nav Zones are covered in Lesson 02: Course and Speed.
Go to the Lesson55 Show All map. Ensure that all Nav Zones are set to display in the Map Preferences. A Neutral Zone has been drawn around the Faeroe Islands.
Open the Sides Maintenance window from under the Edit pull-down menu and switch to side Bravo and note that no Nav Zone exists. Switch Sides back to Good Guys.
Click on the Circle attached to the Nav Zone then select the Edit pull-down menu and choose Copy Threat Poly. The Nav Zone has now been copied over to Alpha, Bravo, and Charlie sides.
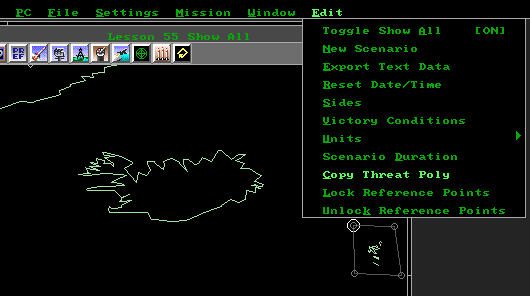
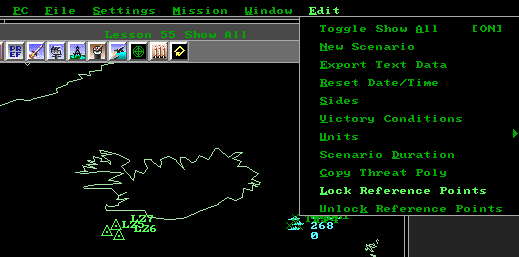
4. Lock and unlock reference points
When a scenario is started, all reference points are erased for the player's side. However, some RefPts serve as a player aid telling them where to go and so should not be removed.
Select Sides under the Edit pull-down menu, switch to Alpha, and click on OK.
Drag-select the three RefPts LZ5, LZ6, and LZ7 to make them active. Under the Edit pull-down menu, select Lock Reference Points. The three RefPts will now appear when the scenario is started from side Alpha. The process can be reversed with the Unlock Reference Points command.
Summary:
Several commands exist to aid the designer by showing all units, changing start time and date, copying data from one side to another, and display options.
Delete the side for Good Guys and use the File >> Save As command to save the file as SHOWALL.SCN
Load Lesson 56: Rebuild function
Open the Windows >> Orders screen and keep it open throughout this Lesson
Following this lesson, the user should be able to:
1. Scrub launches
2. Use re-build function
If Lesson55 was followed precisely, Lesson56 should be a virtual duplicate of the SHOWALL.SCN file saved at the completion of Lesson55 (with the exception of the Good Guys side containing the orders).
1. Scrub launches
Select Sides under the Edit pull-down menu, click on side Alpha, and click on OK.
Go to the Alpha zoom map window and ensure that Unit Display mode is enabled.
Click on the CVHG Moskva RUS 67-94 icon. The Unit Status window will show "Ready A/C: 18/18". All eighteen of the eighteen assigned aircraft are ready for launch.
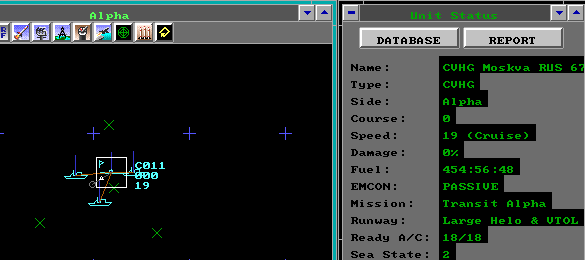
Click on the Air Ops button (or use F6) and see only:
2x Ka-25 Hormone A
2x Ka-29RLD Helix
8x Yak-38 Forger A
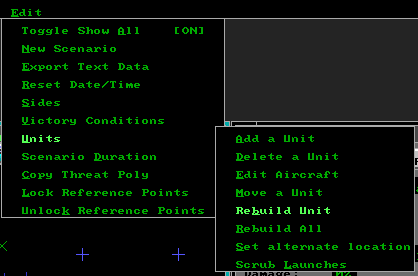
displayed because Formation air patrols were assigned in Lesson 49: Missions. The six aircraft absent from the display are in the process of taking off. To cancel these formation air patrols, open the Edit pull-down menu and select Units >> Scrub Launches. This command can be used for individual units as well as groups.
In H3, the planes land and will be ready in 30 minutes.
In ANW & HUE, the planes land and are immediately ready for re-use.
2. Use re-build function
While this does not happen for the PlayersDB, other databases may change over time. Values for sensor sensitivity, weapons capabilities, and other modifications are made. To have those new values incorporated into an existing scenario, use the Edit >> Units >> Rebuild Unit function on individual units and the Rebuild All function for the entire scenario.
When applied, the rebuild command will re-set all of the current characteristics for air, sub, land, and surface units inserted into the scenario back to the default values of the database.
Weapons that have been unloaded from mounts will be re-loaded and sensors will return to their default settings. Ships default to passive mode while land units default to active.
Qualities that will not be changed are the weapons loaded or unloaded from magazines and ammo dumps by the designer.
Summary:
The scrub launches command cancels formation air patrols. The rebuild command re-sets units to the default values of the database.
Delete the side for Good Guys and use the File >> Save As command to save the file as REBUILD.SCN
Load Lesson 57: Orders
Open the Windows >> Orders screen and keep it open throughout this Lesson
Following this lesson, the user should be able to:
1. Write orders
2. Playtest
If Lesson56 was followed precisely, Lesson57 should be a virtual duplicate of the REBUILD.SCN file saved at the completion of Lesson56 (with the exception of the Good Guys side containing the orders).
1. Writing orders
Select Sides under the Edit pull-down menu and click on side Alpha. The right panel contains the orders for this side.
Order writing is subjective. Some past conventions may be helpful.
Header
Orders for Cmdr Bravo
Operations Intell/SitRep:
Statements about the current intelligence and situation reports that reveal
the location of the enemy or about the confict in general.
Mission:
Statements based upon the scenario objectives
Execution:
Suggestions on strategy for accomplishing the scenario objectives. Absolutely
essential goals should be mentioned, i.e. "Arrive at LZ and remain on
station for four hours."
Command and Signal:
Name the flagship or HQ location and the required EmCon status (i.e. Active
or Passive sensors).
Enter orders for each side (except the AI-controlled Charlie). Remember that players will be approaching the scenario for the first time and need sufficient information to perform necessary tasks; they do not have the benefit of the designer in knowing everything about the scenario.
2. Playtesting
It is possible to run the scenario from the Scenario Editor and watch everything occur with the Show All function enabled. However, this is not a good test regiment since the AI will react differently when the scenario is run under the game engine.
Summary:
The scenario is complete once written orders are added to tell the player how to achieve the assigned goals. Ensure sufficient detail is provided and remember that every player is approaching the scenario for the first time and knows nothing.
Delete the side for Good Guys and use the File >> Save As command to save the file as COMPLETE.SCN
Open the Windows >> Orders screen and keep it open throughout this Lesson
This Lesson is only applicable to ANW & HUE users.
Following this lesson, the user should be able to:
1. Re-build unit magazine
2. Re-build scenarios individually
3. Re-build scenarios by batch
4. Set parental unit for aircraft
1. Re-build unit magazine
Select Sides under the Edit pull-down menu and click on side Bravo and go to the Bravo zoom map. Ensure that it is in Unit Display mode.
Click on the A/B Ammo Dump and then the Report button from the Unit Status window to see that the ammo dump currently contains:
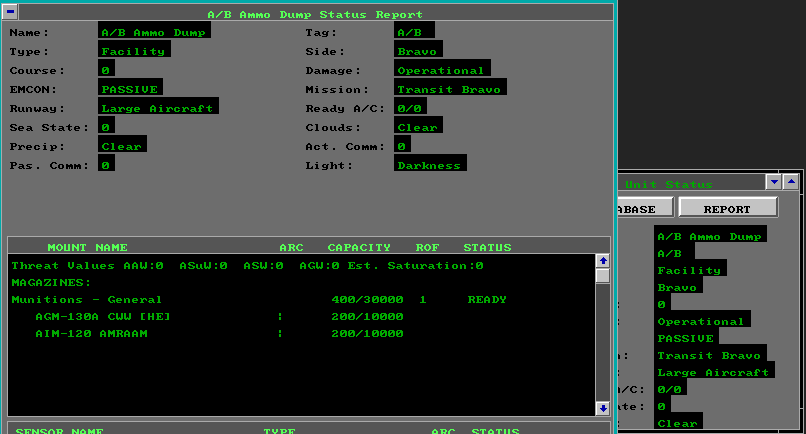
200x AGM-130A CWW [HE]
200x AIM-120 AMRAAM
Under the Edit pull down menu, select Units >> Re-build Unit Magazine. The Magazine will be re-set to the database default (empty).
Re-load Lesson 58.
2. Re-build scenarios individually
Under the Edit pull-down menu, select Scenario Rebuild to see the four-step procedure:
Export All Unit Weapon Edits
Re-build All Units
Re-build All Unit Magazines
Import All Unit Weapon Edits
Export All Unit Weapon Edits
Click on this command to generate a file to record weapons loaded or unloaded from weapons mounts, ammo dumps, and magazines. Examine the Lesson58.SEM file with any text editor.
Re-build All Units
Except for magazines, the qualities of all units in the scenario will adopt the current database default settings. Click on this command.
Re-build All Unit Magazines
All magazines will adopt the current database default settings.
Click on this command then activate the Show All function under the Edit pull-down menu and check the A/B Ammo Dump with the Report button from the Unit Status window to see that it is empty.
Import All Unit Weapon Edits
The previous weapons and magazine loadouts saved to Lesson58.SEM will now be imported back into Lesson58.
Click on this command and use the Report button to check the A/B Ammo Dump to see that the weapons have been re-loaded.
3. Re-build scenarios by batch
Instead of performing the four-step re-build process on each and every individual scenario, it is possible to re-build a batch or battleset of scenarios simultaneously.
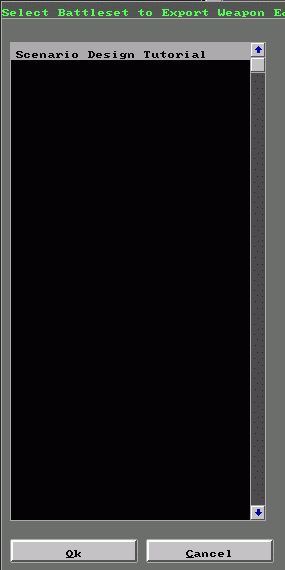
Preserve the current weapon settings and magazine loads by clicking on the Batch Export Weapon Edits >> From Battleset command from the Edit pull-down menu.
The Select Battleset to Export Weapon Edits dialog box appears. Select the Scenario Design Tutorial battleset and click OK. One *.SEM file will be created for each scenario listed in the battleset. Re-load Lesson58.
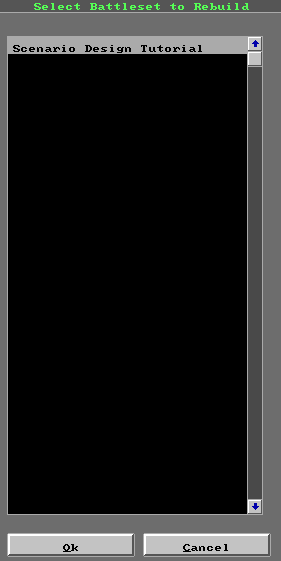
Now, select the Batch Rebuild >> From Battleset command from the Edit pull-down menu then select the Scenario Design Tutorial entry. Click on OK and the entire battleset will be re-built. The previous weapon edits will automatically be re-imported from the *.SEM files. Re-load Lesson58.
The Batch Rebuild >> From Scenlist.ini command is currently non-functional.
4. Set parental unit for aircraft
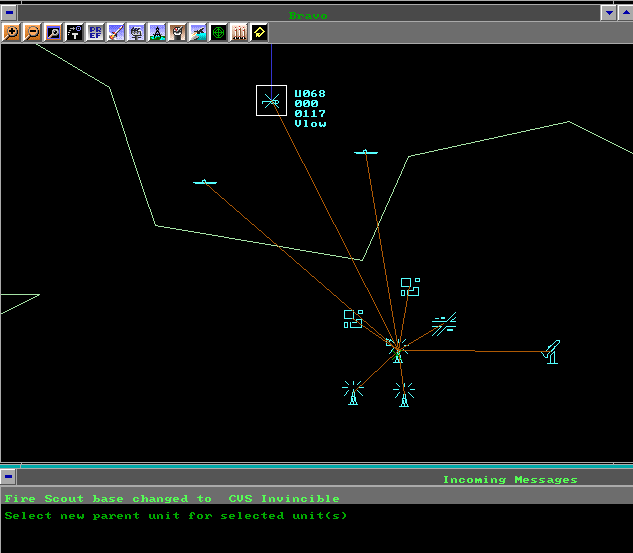
Aircraft can be inserted directly into a scenario in the same manner as ships, submarines, facilities, and installations. They will automatically land on the first eligible base or ship. A designer can set a different ship for the aircraft.
Enable the Show All function and go to Bravo zoom map. Unpause the scenario and watch the Fire Scout land on CVS Illustrious.
Re-load Lesson 58.
Select Sides under the Edit pull-down menu, and click on side Bravo from the left panel and go to the Bravo zoom map.
Select the Fire Scout and use the Edit >> Units >> Set Parent Unit command and click on the CVS Invincible. The Fire Scout will now land on the CVS Invincible instead of the Illustrious.
Summary:
Scenarios can be re-built individually or as a Battleset group. Care must be taken not to erase previous weapon changes. Airborne aircraft directly inserted into a scenario can be assigned to different home bases.
Lesson 59 Sonar Conditions [HUE]
Open the Windows >> Orders screen and keep it open throughout this Lesson
This Lesson is only applicable to HUE users.
Following this lesson, the user should be able to:
1. Set sonar conditions
2. Set unit side
3. Use mission profiles
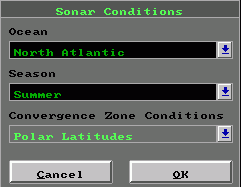
1. Set sonar conditions It is possible to lay sonar conditions from other parts of the world onto the current scenario. Customizations include selection of the Ocean area, the season, and latitude.
Under the Edit pull-down menu, select Edit Sonar Conditions. From the Sonar Conditions dialog box, select Indian Ocean, Winter Season, and Mediterranean Convergence Zone Conditions then click on OK.
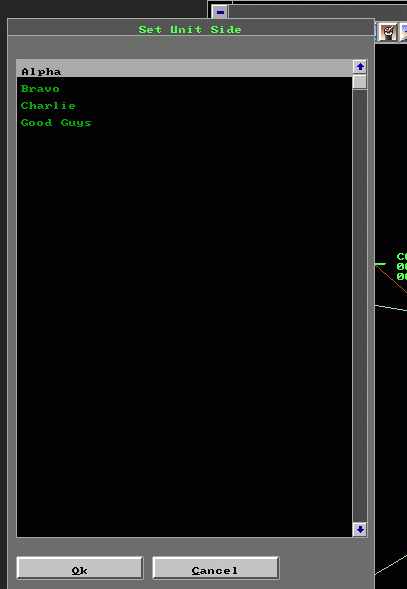
2. Set unit side
It is possible to switch a unit from one side to another.
Open the Sides Maintenance window under the Edit pull-down menu and select Bravo from the left panel then go to the Bravo zoom map. Select the CVS Invincible.
Under the Edit pull-down menu, select the Units >> Set sides command and the Set Unit Side dialog box appears. Click on Charlie and then OK. Enable the Show All command under the Edit pull-down menu and look in the Unit Display window to see that the ship is now assigned to side Charlie.
3 Use mission profiles
It is possible to modify the underlying parameters used to control the behaviour of a mission. This function allows scenario designers to develop different special missions and distribute those profiles as part of their scenarios. The special profiles are incorporated into the *.SCN files when distributed.
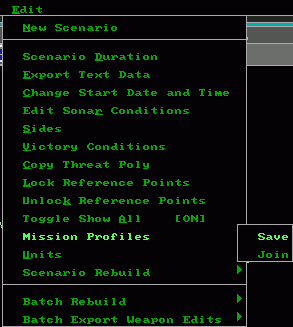
Under the Edit pull-down menu, select Mission Profiles >> Save. This will extract the previously hidden profile information from the currently loaded *.SCN file and save it in the Doctrine sub-folder as *.HPS files.
The Join command is used when a designer has created a new profile based upon an existing profile and this new profile is used by the current scenario. If the scenario is distributed and the recipient user has a different selection of profiles, the scenario may not run as intended by the designer. The Join command stores the designer's specific profile data within the current *.SCN file.
Mission profiles are also covered in the Lesson 09: UnRep, Board, and Seize tutorial.
Summary:
Sonar conditions from other areas can be used. Units can be switched between different sides. Mission profiles can be extracted from or incorporated into the current *.SCN file.
Open the Windows >> Orders screen and keep it open throughout this Lesson
[SPECIAL] For the purpose of this Lesson, ensure that both the ClassRestrictionbyCountry and ClassRestrictionbyTime options have been enabled when the Scenario Editor was started. Otherwise, results will be erroneous for this particular Lesson. If necessary, make the changes and re-start this lesson.
Following this lesson, the user should be able to:
1. Use class restrictions by time
2. Insert complete installations
1. Use class restrictions by time
Under the Edit pull-down menu, Toggle the Show All command and then select Units >> Add a Unit or use the Insert hotkey (not NumPad0). Click near RefPoint Delta. The Select Unit Type dialog box appears. Click on the radio button next to Ship and click OK.
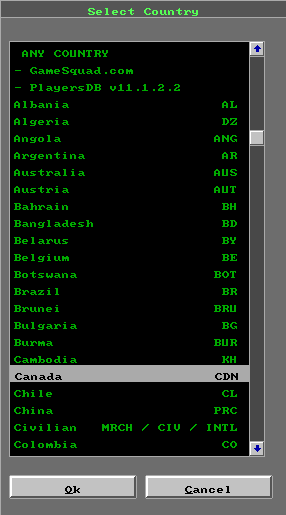
The Select Country dialog box appears. Click on the entry for Canada and click OK. The Ship Select dialog box appears with all the possible Canadian ships for this time period. Only those units on active service during this scenario (1995) will be offered. Units that have been retired or not yet commissioned will be excluded.

Click on FFH Halifax CDN 93 and then OK. The SelectShip dialog box appears and lists the various possible units. Select HMCS Regina and click OK.

Designers can avoid the country restriction by selecting ANY COUNTRY to see a full list of ships.
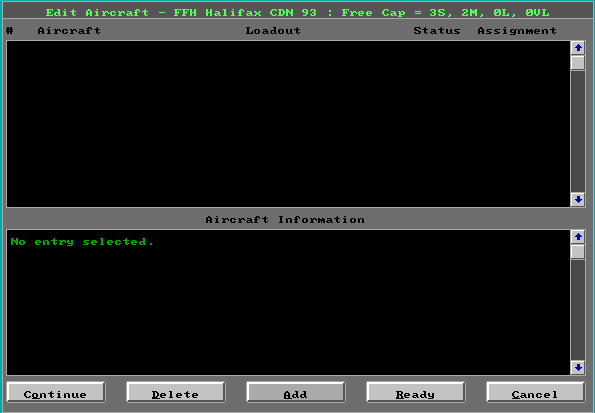
[ANW & HUE users only] Click on the HMCS Regina and give the Edit >> Units >> Edit Aircraft command. The Edit Aircraft window will appear. Click on the Add button.
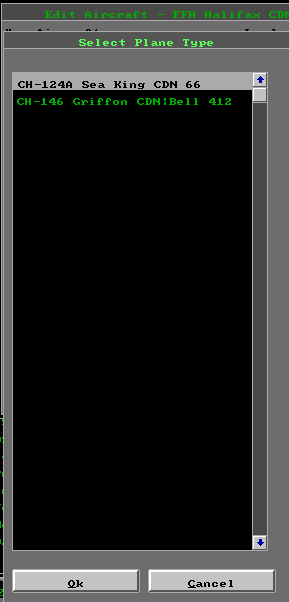
The Select Country dialog box appears. Click on Canada and OK. The Select Plane Type dialog box appears with only those Canadian helos available in 1995. Click on CH-124A Sea King CDN 66 and then OK. The Number of Sea King CDN 66 to Add dialog box appears. Enter 2 and click OK. Click Continue to exit.
2. Insert complete installations
Installations are fully pre-arranged and pre-fabricated base groups. Instead of building a base one facility at a time as shown in previous Scenario Design Lessons, an entire base can be inserted with a single click.
Under the Edit pull-down menu, select Units >> Add a Unit and then click on RefPt Echo. The Select Unit Type dialog box appears. Click on the radio button next to Installation and then OK.
The Select Country dialog box appears. Click on ANY COUNTRY and then OK. The Installation Select dialog box appears. Select Airfield [Large] v8 and click OK. A fully arranged base group will appear.
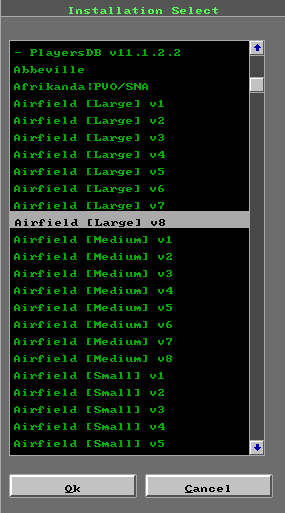
Toggle the Unit Display mode and zoom in to see the individual base facilities. The units can now be moved or deleted as desired.
Summary:
When selecting units for insertion into a scenario, the scenario editor can be be ordered to show only the units for a specific country and/or a certain time period. Instead of building a base one facility at a time, it is possible to insert a fully pre-fabricated base installation with a single click.